Electrolisis
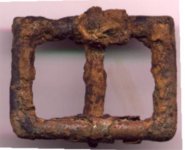
This is something that was sent to me by my friends with Bulletman's club from New Orleans. The pic attached is an example of the result. Hope this helps.
Electrolysis Instructions
The process I use is the result of researching a lot of different methods, speaking with experts who clean artillery shells and combining a few different techniques into one that I find is clean, efficient and safe.
To begin with, electrolysis cleans metal by placing an electrical charge between the solid surface of the item being cleaned and the rust or corrosion coating it. The electrical charge removes this coating. I have also been told the use of electrolysis helps drive moisture as well as salt from the inside of objects being cleaned. Not being a chemist or engineer I cannot speak to that but accept it.
When I first dig an iron object like artillery shells or fragments, I place them in a bucket and cover them with hot water. I have a hot water line in my back yard that I ran for this purpose. This prevents the iron from drying out , cracking or scaling , helps begin the cleaning process and flushes out salt from the metal. I do this several times, brushing the iron items with a metal brush between soakings until all of the dirt and most of the loose rust or scale comes off. DO NOT hit the iron relic with a hammer or any metal object attempting to knock off rust or corrosion. Iron right out of the ground, particularly damp or wet ground is fragile and striking it with a hard metal object will fracture it.
While the iron is soaking you can gather the rest of the equipment you need and set it up. Here’s what to get and how to do it:
1.) A battery charger with a 6 volt/12 volt switch and an amperage switch with a 2amp/6 amp position and a manual charge position switch. These are hard to find. I could find a 6 volt/2 amp combination but had to buy a second charger to get a 6 volt/6 amp setting. You will use the 6volt/2 amp setting for normal cleaning and the 6 volts/6 amps setting for initial cleaning of heavily encrusted iron.
2.)A tank for the electrolysis process. I use several, depending on the size of what I am cleaning. Sometimes a five gallon bucket , a Rubber Maid type kitty litter pan, or a Rubber Maid storage box, etc. You get the idea.
3.)An electrolyte. After much trial and error I use plain old Arm and Hammer Baking Soda. It is safer, cleaner and cheaper than lye and I think it works just as well. Use about a half a box to every 2 and a half gallons but this is not real critical. More or less is fine.
4.) An Anode. The anode is what cleans your iron object. It is connected to the POSITIVE clamp on the battery charger. I use 1/4 inch or 1/8 inch steel plate or stainless if I can find it. I usually use a piece about 6 inches by 10 inches. I find the larger the surface the better the cleaning goes. I get this from trash piles at welding shops. It needs to be clean before you use it, not rusty. A wire brush or sandpaper works fine, sand blasting works better if you have access to a blasting cabinet.
5.) A Drill Press . I use this to drill a 7/64'th hole in Cannon balls or fragments , then tap the hole ( thread it) with a 6/32 tap. Sounds complicated but it’s a snap. You get the drill and tap set at Home Depot. Use machine oil when you drill the hole in the iron and use it again when you thread the hole. Do not force the tap when trying to thread the hole it will snap off. If it is hard to turn, back it out clean out the hole put in more oil and slowly thread it again. Easy does it. Clean the oil out of the hole. Next I screw into the hole a 6/32 brass screw of what ever length I require. ( easy does it here as well, brass screws snap off easily) This makes a good solid metal to metal contact which is critical to electrolysis. To this screw or a copper wire leading from it I connect the NEGATIVE
clamp from the battery charger. If the item you are cleaning can simply be clamped with the NEGATIVE LEAD then of course you do not have to tap a hole, just attach the clamp to it. The NEGATIVE clamp can be in the water, it doesn’t hurt it. ( However, if lye is used as an electrolyte , it will eat it up.)
6.) Mix up your electrolyte, enough to cover the item being cleaned by a couple of inches. Place the Relic in the water/electrolyte, attach the negative lead to it. Place the anode in the water. Make sure more than enough is sticking out of the water to attach your POSITIVE clamp to it. Make sure the Anode and the relic DO NOT TOUCH and are separated by several inches.
7.) Plug in the charger. In a few seconds you should see bubbles coming from the relic you are trying to clean. This means it is working properly and you have a good connection. No bubbles , bad connection, double check all connections again. With baking soda sometimes the Anode will bubble a bit but this is no problem....AS LONG AS THE POSITIVE CLAMP IS CONNECTED TO THE ANODE AND NEGATIVE CLAMP IS CONNECTED TO THE RELIC...OTHERWISE YOU WILL CLEAN YOUR ANODE AND DESTROY YOUR RELIC.
8)Check on the process. After a few hours or overnight, check the relic. FIRST..unplug the charger. Take out the relic. Some rust or scale should “eggshell” off. Brush it with a stiff bristled brush or a wire brush. A lot of “black stuff” should begin coming off along with some scale and rust. Next rinse it with clean water. If it looks like it needs more cleaning, it probably does so put it back for more treatment. DO NOT attempt to force any lumps of corrosion or rust off by hitting it. This will often lead to damaging your relic, I know because I have done it much to my regret. Keep taking it out and cleaning it from time to time until it looks O.K.
9.) After it is clean ( Sometimes it takes a few hours , sometimes a few days) from electrolysis. I use detergent and a brass bristled brush for a final cleaning. For some reason
a brass brush cleans iron better than a regular wire brush.
10.) Salt Purge. If the iron I am cleaning came from a salt marsh or salty area. I then boil it for a few hours for a final purging. You can also use several warm or hot water soakings.
All of the iron I dig from salty areas I let soak in water for a while PRIOR to electrolysis, changing the water frequently.
11.)Final Drying. I then put the relic in the oven at about 250 degrees and bake it overnight or all day while I am at work. After taking it out of the oven and it is cool enough to handle. I dry brush it again with a brass bristled brush to remove any surface rust. Even if you do not see it, it IS there. You will notice the difference after you brush it.
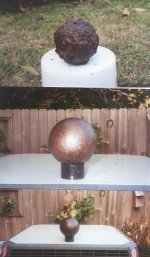
12.) Final Coating. There are several coatings I use but my favorite is Mahogany Briwax. While the ball is still warm from the oven, I use an appropriately sized, cheap paint brush to brush Briwax on the ball. It will melt and soak into the metal. Apply it until the iron will take no more and the wax gets a slight “build”. Let it dry and polish it with a shoe brush and a soft rag and you are finished. The brown wax gives it a nice patina. You can also
spray the warm iron with a quick drying lacquer or polyurethane varnish, depending on the look you want. I find the wax is ideal but, each to his own.
FINAL NOTES.
Of course there are a number of variations to this process and I’ll mention a few here. Some people use copper pipe as an anode. While this works extremely well and is very conductive, in my experience it tends to add too much of a copper color to the iron and the copper anode requires frequent cleaning to work efficiently. I have used it for a few hours and then switched to iron for particularly troublesome pieces when I am in a rush...but a large , flat, clean iron anode seems to get the best overall results for me.
Cleaning more than one item at once. You can do this by placing a copper pipe across your tank . You drill holes in the pipe for sheet metal screws , attach copper wire to the screws , tighten them up for a good connection, attach the wires to the relics in the tank and then connect the NEGATIVE LEAD to the copper pipe. All the attached relics should begin bubbling. This is helpful when you have a bucket of fragments to clean. Keep in mind you can attach small clamps to the copper wires to clamp on to the relics or just wrap the wire around the brass screw and tighten it. You get these clamps at Sears auto supply, Wal Mart , etc.
APOLOGIA
AND OF COURSE , MY APOLOGY IN ADVANCE TO ANY AND ALL SCIENTISTS, CHEMISTS OR ENGINEERS WHO MAY READ THIS.
I AM NONE OF THE ABOVE AND HAVE ONLY A RUDIMENTARY UNDERSTANDING OF ELECTROLYSIS. FOR EXAMPLE: THERE ARE MANY QUESTIONS ABOUT VOLTAGE AND AMPERAGE IN THIS PROCESS FOR WHICH I AM STILL SEEKING ANSWERS .
IF ANY TRAINED OR MORE EXPERIENCED PERSON WISHES TO ADD TO THIS OR CORRECT ANYTHING I HAVE WRITTEN PLEASE DO SO, SINCE THIS HAS BEEN A LONG LEARNING PROCESS FOR ME. AT THIS POINT IN TIME THE ABOVE PROCESS WORKS THE BEST OF ANY I HAVE USED